How to Add Indicators to Expert Advisors on MT4
MetaTrader 4 (MT4) is a renowned trading platform widely used for forex trading. One of its most powerful features is the ability to use expert advisors (EAs) – automated scripts that can execute trading strategies. Many traders enhance the capability of EAs by integrating them with popular trading indicators.
Understanding Indicators
Trading indicators provide graphical representations of various financial data and metrics. They assist traders in analyzing the price movement and making informed trading decisions. Some of the most commonly used indicators in MT4 include:
- Moving Average (MA): Represents an average of prices over a specified period.
- Relative Strength Index (RSI): Measures the speed and change of price movements.
- MACD (Moving Average Convergence Divergence): Tracks differences between two moving averages.
- Stochastic Oscillator: Compares a specific closing price to a range of its prices over a particular time period.
- Bollinger Bands: Consist of a middle band, upper band, and lower band, indicating volatility.
- Parabolic SAR (Stop and Reverse): Provides entry and exit points.
- ATR (Average True Range): Measures market volatility.
- Pivot Points: Determine overall market trends across different timeframes.
- Ichimoku Cloud: Identifies support and resistance levels and generates trading signals.
Integrating Indicators with EAs
Adding an indicator to your EA in MT4 involves utilizing the MQL4 language. Here's a basic step-by-step guide:
- Open the MetaEditor by clicking the 'Navigator' panel on MT4 and selecting 'Expert Advisors'.
- Choose an existing EA or create a new one.
- In the coding section, identify the spot where you wish to add your indicator.
- Use the appropriate MQL4 function to call the desired indicator. For instance, to call the Moving Average:
double maValue = iMA(Symbol(), Period(), 20, 0, MODE_SMA, PRICE_CLOSE, 1);
This function fetches the value of a 20-period Simple Moving Average (SMA) of the closing price.
This letter "i" is what you use to call on an indicator in mql4 code. For example an RSI indicator is called into use with the code iRSI.
Every indicator is called upon using the letter i before it.
MetaEditor knows that you are about to call some function, so it will attempt to fill in the blanks for you, such as in the picture below...

As you can see it autofilled the options iBands, iBandsOnArray, iBarShift and iBars. "iBands" is the code name for the Bollinger Bands Indicator.
Now, simply use this same technique to add in as many indicators as you need. Give each a unique name and you will be ready to use them with your buying and selling conditions and closing and modifying conditions.
We now understand that to call an indicator, we use the letter "i".
After we have called the indicator though, we have to fill in its parameters. Luckily MetaEditor shows us what each indicator needs.
The picture below, displays this, in action.
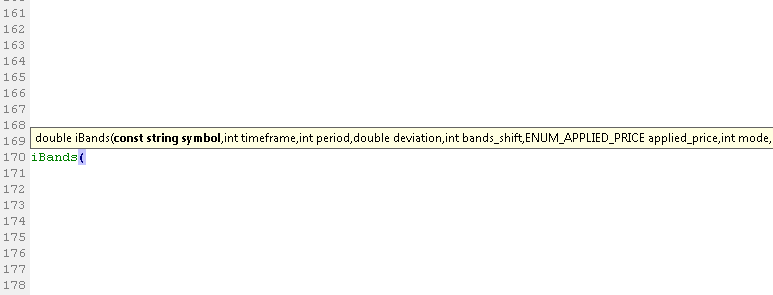
As you can see, for the iBands Indicator it shows that we need to fill in the following, separated by commas:
Const String Symbol, int timeframe, int period, double deviation, etc...
To find out what all each indicator uses, run a quick google search for "iBands indicator mql4". You will generally find the MQL4 Documentation as the top hit. Got there and you will see what options you have for each indicator.
For example iBands will need to know which band you are referring to. The upper or Lower. You use "MODE_UPPER" and "MODE_LOWER" to determine this.
Some indicators do not use the name you may think, so you can always check some common names here.
| iNAME | Indicator |
| iAC | Accelerator Oscillator |
| iAD | Accumulation/Distribution |
| iADX | Average Directional Index |
| iAlligator | Alligator |
| iAO | Awesome Oscillator |
| iATR | Average True Range |
| iBearsPower | Bears Power |
| iBands | Bollinger Bands |
| iBullsPower | Bulls Power |
| iCCI | Commodity Channel Index |
| iCustom | Custom Indicators |
| iDeMarker | DeMarker |
| iEnvelopes | Envelopes |
| iForce | Force Index |
| iFractals | Fractals |
| iGator | Gator Oscillator |
| iIchimoku | Ichimoku Kinko Hyo |
| iBWMFI | Bill Williams Market Facilitation Index |
| iMomentum | Momentum |
| iMFI | Money Flow Index |
| iMA | Moving Average |
| iOsMA | Moving Average of Oscillator |
| iMACD | Moving Average Convergence-Divergence |
| iOBV | On Balance Volume |
| iSAR | Parabolic Stop and Reverse System |
| iRSI | Relative Strength Index |
| iRVI | Relative Vigor Index |
| iStdDev | Standard Deviation |
| iStochasticRSI | Stochastic Oscillator |
| iWPR | Williams Percent Range |
Testing Your EA with Indicators
Once you've added the desired indicators, it's crucial to test the modified EA:
- Save and compile your EA in the MetaEditor.
- Go back to MT4 and attach the EA to a chart.
- Use the "Strategy Tester" feature in MT4 to test the EA with historical data, ensuring the indicators work as intended.
Final Thoughts
Adding indicators to EAs enhances their functionality, providing a more holistic trading strategy. While MT4 offers a vast range of in-built indicators like the Moving Average, RSI, and MACD, traders can also find custom-made indicators online or even create their own in the MetaEditor. Always remember to test any modifications thoroughly before going live to ensure optimal performance.